Over the years I´ve been asked "what paints, what brushes?" do I use, or seeing Questions like "how does one stop the paint flaking?" so an attempt at answers below.
The painting method Shown below is a fast (ish) one to create numbers of finished bods to fill up a wargames base and stand the "it looks ok from three feet away" test.
Make of Colours used.
I don´t go for having loads of different shades in expensive Little 12ml pots that are specifically marketed at the Hobby.
First time I Held one in my Hand and smelt the Contents ..I said to myself.."aha!, Floor cleaner". I can´t remember the Name but it´s The type that gives the dry Floor a matt Shine.
I Did a test with the paints named below. Added a drop of Floor cleaner into the mix and guess what? The paint seemed to flow a wee bit better but the end result had a matt Shine. Also..the paint could, by Scratching with a finger nail, be peeled off.
Acrylics naturally but the stuff from Hobby / Craft Shops, in my case Marabu, Kreul or Hobbyline. All give a matt finish unlike some paints I could Name which end up a bit shiny, which, if a matt finish is wanted, means paying out for overpriced, in some cases, Health and enviroment damaging, matting agents. IMHO, a waste of time and Money.
Big 50ml pots of the stuff for a couple of euros each. Black, White, Brown, Red, Yellow and Blue. 20ml pots of Gold and Silver from Plaka or Rico..two more Hobby/Craft shop paint lines. They do have a wide range of Colours so an advantage for those not familiar with a Colour Wheel or like having the Colour quick to Hand with no mixing.
Also, ever considered who actually makes the tinsy winsy overpriced pots of paints? Does anyone really imagine they actually have a factory producing paints just for them? Do some Research, you might be suprised.
Ah, mixing. I use a pallette..an old CD or the like. Using the tip of the handle of the Paintbrush, I get a bit of paint out of the pot, wipe it on the CD, clean the handle and repeat the process with the next Colour.
The mixing water..tap water with a drop of washing up liquid added.
Brushes
Cheap n´cheerfull from Rico. None of this "ooh, I´ve got a Special non slip Turbo brush with LED´s, some twonk firm Name on the side and instruction manuel in 16 languages"
None of that helps if you´ve got no idea how to paint. Tinsy winsy brushes that are only visible with a Elektron micropscope don´t help in getting a fine line. If the tips sharp and loaded with a decent measured amount of paint, then, as the old saying goes, in this case, slightly turned on it´s head, "size doesn´t Count" .
Obviously, the same result won´t be achievable with a 3" wall paint brush but trying to reduce the size of the brush tip to microscopic Levels won´t make the tip any sharper.
If one thinks it helps to have overpiced Colours and brushes, then fine but I don´t like the idea of feeding an Industry which, IMHO, by adding a brand Name to anything, rips us off. The bods and vehicles cost enough as it is without chucking away more cash.
Do I wash the bods first? No. The base paint gets added and finish. Never had a Problem with flaking..and I´ve dropped enough to test wether the paint holds. Maybe there´s some sort of plastifier in the Hobby paints or "scrubbing" the paint on has some adhesive effect..TBH, I don´t know.
OK...Paints and brushes covered. What Comes next is a Basic "how to" on painting. My technique is similar or the same as a lot of painters so basically, if you like the way you paint and the results, stop reading now.
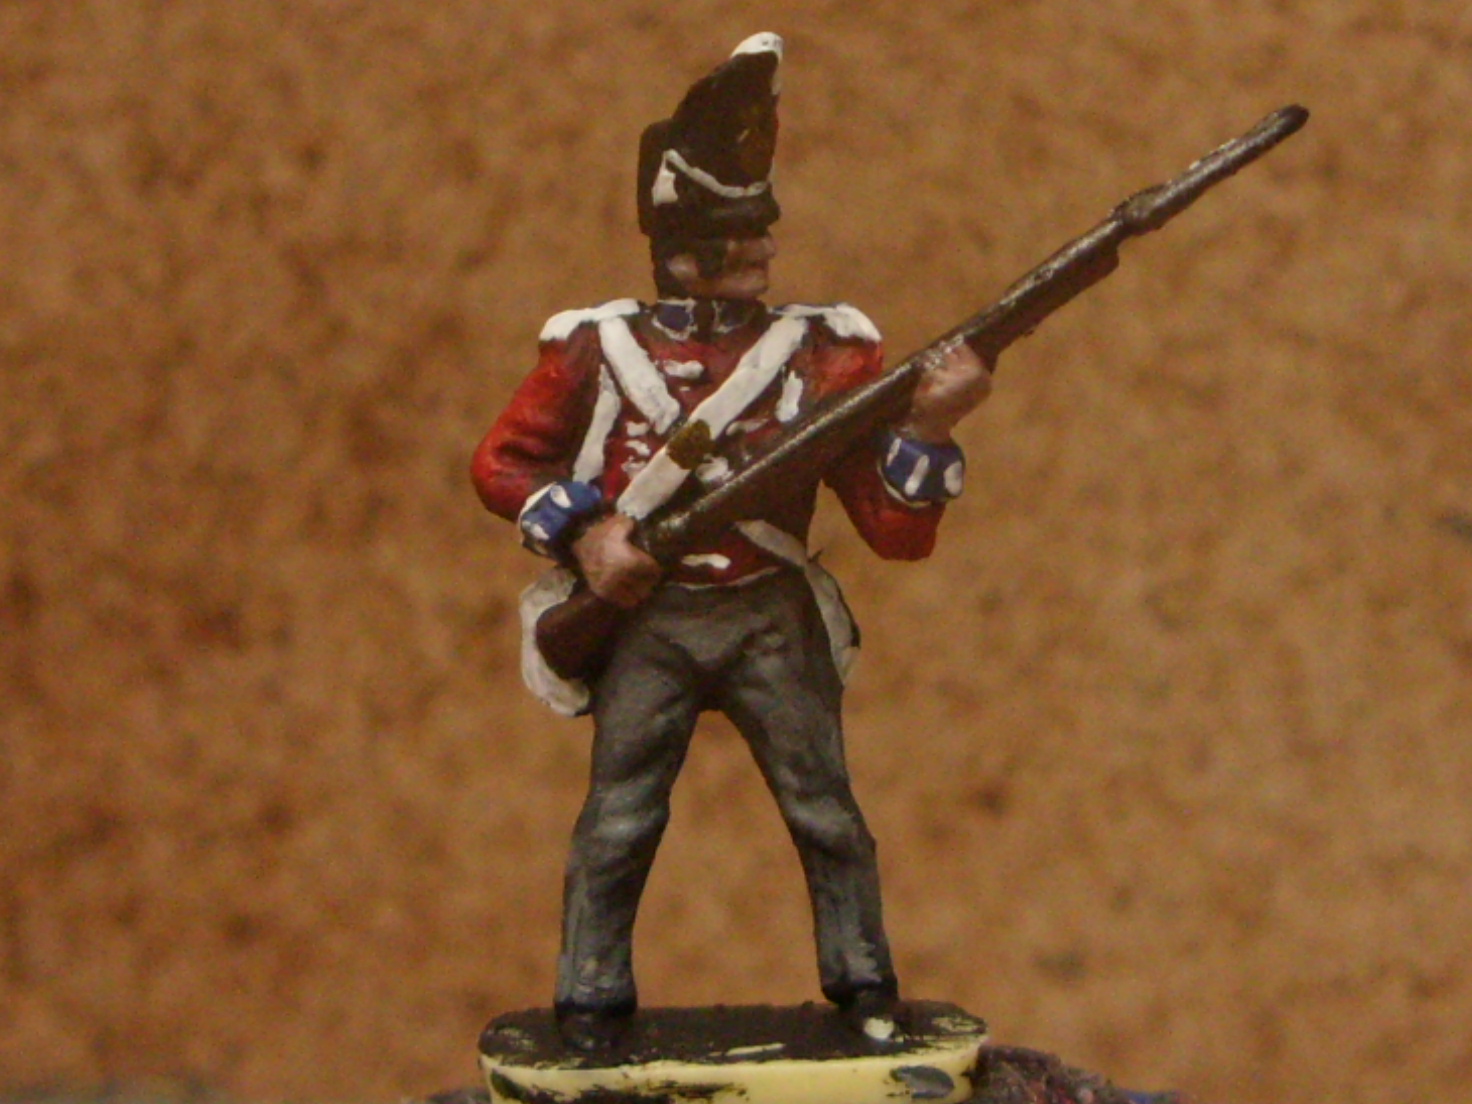
The Bod used is a Standard pose from the Airfix Waterloo British Infantry set. Cream softish plastic, bought ca. 1975. The head has been Twisted to the left to give a front facing "Ready" pose.
First base paint. Black, Marabu/Kruel acrylic "scrubbed" on with an brush that was originally for fine painting, then lost it´s fine Point after being abused for dry brushing and ended up Looking a bit like a chimney sweeps brush.
Skin*
First I paint (using marbu acrylic Midbrown) the face and Hands. Arms and legs don´t really Need this stage but Hands and faces do. The midbrwon Acts as a Bridge between the black base and the final Colour.
I don´t go for having loads of different shades in expensive Little 12ml pots that are specifically marketed at the Hobby.
First time I Held one in my Hand and smelt the Contents ..I said to myself.."aha!, Floor cleaner". I can´t remember the Name but it´s The type that gives the dry Floor a matt Shine.
I Did a test with the paints named below. Added a drop of Floor cleaner into the mix and guess what? The paint seemed to flow a wee bit better but the end result had a matt Shine. Also..the paint could, by Scratching with a finger nail, be peeled off.
Acrylics naturally but the stuff from Hobby / Craft Shops, in my case Marabu, Kreul or Hobbyline. All give a matt finish unlike some paints I could Name which end up a bit shiny, which, if a matt finish is wanted, means paying out for overpriced, in some cases, Health and enviroment damaging, matting agents. IMHO, a waste of time and Money.
Big 50ml pots of the stuff for a couple of euros each. Black, White, Brown, Red, Yellow and Blue. 20ml pots of Gold and Silver from Plaka or Rico..two more Hobby/Craft shop paint lines. They do have a wide range of Colours so an advantage for those not familiar with a Colour Wheel or like having the Colour quick to Hand with no mixing.
Also, ever considered who actually makes the tinsy winsy overpriced pots of paints? Does anyone really imagine they actually have a factory producing paints just for them? Do some Research, you might be suprised.
Ah, mixing. I use a pallette..an old CD or the like. Using the tip of the handle of the Paintbrush, I get a bit of paint out of the pot, wipe it on the CD, clean the handle and repeat the process with the next Colour.
The mixing water..tap water with a drop of washing up liquid added.
Brushes
Cheap n´cheerfull from Rico. None of this "ooh, I´ve got a Special non slip Turbo brush with LED´s, some twonk firm Name on the side and instruction manuel in 16 languages"
None of that helps if you´ve got no idea how to paint. Tinsy winsy brushes that are only visible with a Elektron micropscope don´t help in getting a fine line. If the tips sharp and loaded with a decent measured amount of paint, then, as the old saying goes, in this case, slightly turned on it´s head, "size doesn´t Count" .
Obviously, the same result won´t be achievable with a 3" wall paint brush but trying to reduce the size of the brush tip to microscopic Levels won´t make the tip any sharper.
If one thinks it helps to have overpiced Colours and brushes, then fine but I don´t like the idea of feeding an Industry which, IMHO, by adding a brand Name to anything, rips us off. The bods and vehicles cost enough as it is without chucking away more cash.
Do I wash the bods first? No. The base paint gets added and finish. Never had a Problem with flaking..and I´ve dropped enough to test wether the paint holds. Maybe there´s some sort of plastifier in the Hobby paints or "scrubbing" the paint on has some adhesive effect..TBH, I don´t know.
OK...Paints and brushes covered. What Comes next is a Basic "how to" on painting. My technique is similar or the same as a lot of painters so basically, if you like the way you paint and the results, stop reading now.
The Bod used is a Standard pose from the Airfix Waterloo British Infantry set. Cream softish plastic, bought ca. 1975. The head has been Twisted to the left to give a front facing "Ready" pose.
First base paint. Black, Marabu/Kruel acrylic "scrubbed" on with an brush that was originally for fine painting, then lost it´s fine Point after being abused for dry brushing and ended up Looking a bit like a chimney sweeps brush.
Skin*
First I paint (using marbu acrylic Midbrown) the face and Hands. Arms and legs don´t really Need this stage but Hands and faces do. The midbrwon Acts as a Bridge between the black base and the final Colour.

Now I paint the Areas using a 50/50 mix of the mid Brown and Game colour Pale flesh (yes, I do have one or two "specialist Hobby paints" * :) )
I try to not paint the Areas between the fingers..not always with success.

Now I dry brush the same mix as stage two but with a tiny bit more pale flesh added. The drybrush goes only onto the raised Areas, nose, ears, chin, cheeks, backs of Hands, etc
How much more pale flesh is added depends largely on how well the percentages of the stage two 50/50 mix worked.


Next..Clothes etc.
I like to and try to paint from the "inside out", to dress the Bods as it were, so the jacket is next.
A mid red with a touch of mid Brown (a mix of roughly 80-20% )
I try as far as possible to stay inside the lines, ie; paint ony what will eventually stay red but as will be seen, it isn´t necessary and trying (particually at this scale) is a pain.


Adding the "White bits"
Bit more difficult, especially the very thin lines like the ones around the cuffs, collar, waistband and the hat.
TBH, you don´t Need a tiny brush to paint things like straps etc..a smallish one will do as it´s the tip of the brush that adds the paint, a sharp Point Counts, not the total size of the brush added to which a trick can be used to thin down the lines.
In the top pic the lines around the cuff, waistband, collar and hat are bigger than wanted so:

Also, the Addition of the White has made the red visually brighter so it was, in this case, worth waiting to see if another Highlight was necessary.
I still might still add a Highlight but I´ll wait until I´ve added more Detail and painted a couple more (I usually paint 4 or 5 at a time) so I can see what a group looks like.


First a mid Grey over the black base..then..


I mix all my own colour shades..basically all I Need is the Primary Colours added to black and White and silver and Gold..although in reality I have a few more colours than that, one being a "european flesh" colour.
All that´s needed, a pallette ( I use old icecream or margarine tub lids - waste not, want not) and a cup of mixing water with added flow enhancer (a drop or two of Window or floorcleaner)
The black/White mix is an example of how I mixed for the trousers, the Brown/"flesh" mix for the faces..1 being (roughly) the shade of the second coat over the black base and 2 the final (roughly) covering by drybrush.
**At this stage I usually "cheat" and add a bit of black to the Brown and paint Things like rifle stocks, spears, shoes and the like. Then add a bit of White and dry brush. Saves time and paint.
**At this stage I usually "cheat" and add a bit of black to the Brown and paint Things like rifle stocks, spears, shoes and the like. Then add a bit of White and dry brush. Saves time and paint.

Cold White, start with light Grey and highlight with White.
Warm White, White with a bit of mid Brown added, then a highlight with a lot less Brown and drybrush with White.
Blue? Depends on end effect wanted. Either start with a bit of black added to the blue or a bit of Brown. Either add White to the first mix to highlight, or more blue to the second mix.
Ok, the above aint going to win any prizes and I don´t always follow the above Methods depending on wether I´m painting an individual or the usual Batch of 4-5 at one sitting but it´s quick and for me, with practice, easy and, En masse, they look. IMHO, ok

Great to see how you approach painting, your stuff is so consistently good it's a real plus to see inside the process.
ReplyDeleteI completely agree as far as paints go, I am in total agreement that craft store paints are fine once you have worked out how to change the consistency ( I use a mix of water and Matt medium). Great post.
What a refreshingly honest and practical approach. I have to confess that I am one of those that has fallen into the small bottle trap, but long suspected that they all come from the same place.
ReplyDeleteI can find the links but they (the paints) are all produced by a handfull of companies who make paints for a range of stuff, walls, ship hulls, cars, you name it they make it.
DeleteA great run through of your skills with the brush!
ReplyDeleteGreat Thin red line !
ReplyDeleteMan, You must have supernatural perception of colors. :D
ReplyDeleteFor me it is difficult to repeat one mix of colours for whole army...
Not really. If the colour is being repeated, as the lot above, then the mix remains on the palette. It may be dry (after a session) but matching the new wet mix is easy enough. TBH, it doesn´t have to be 100% as even a uniformed squad/regiment will have a mix of slight variations of shade/tone. If they are even a couple of tones up or down then they dissapear (blend) within the mass
DeleteI find if I'm using a mixed shade for an army uniform it's good to mix a batch and store them in a dropper bottle. You can pick them up really cheaply on eBay.
DeleteThank you for this tuto. I didn't realize that you were using the drybrush that much, it's expertly done, particularly on the trousers here. I can't be as successful as you are, that's why I paint so many layers with enlightenment instead, and it's longer, of course.
ReplyDeleteI´ve tried the Shading with different dyes/dips etc..but that skill I couldn´t get to work with any effect that I liked or, I used too dark a dip/shade that needed highlighting.
DeleteAlso, when I got back into the hobby I really got into the "block colour" way of painting. Red was painted red, white was white, blue was blue etc and any highlighting/shading would be down to any refelcted light falling on the bods. Works from a distance but not close up. I remeber havng a discussion with my wife about it. She went to art school and questioned my not shading. She planted the idea I wasn´t actually painting but just adding colours to a surface.
One day I read something on a technique to create a "warm" white and a "cold" white, basically using different mixes (including adding blue to the cold white) but the 2 main things I took from it were;
A. Create your own shade of colour or indeed create from the 3 basic colours your own colours
B. Use adding more of the desired final colour and eventually white to highlight to give an impression of shade.
Obviously that´s a basic description of colour/shade creation and needs addition of tricks like "painting to the line" (blacklining" without leaving a black line) tricks on how to create eyes on the bods without actually painting them but using base colours to "appear" through the covering layers, using a batch of colours on sets of bods that have no uniform look (Vikings/Peasnts etc) but it´s way better than my original block style.
The dry brushing is hard on the brushes, I replace them at least 8 times a year but they are craft store ones and I save a lot of money by buying craft store paints so it´s ok. I´ll have to work out some time how much I spend on paints/brushes but one big 50ml pot of Craft shop paint lasts at least 6-8 months.
Anyway, your technique creates a lovely look and you have a style which shows you are an individual.
All too correct, and your results are better than most using 12ml a la carte paints! What is the matt acrylic floor polish that you use? I have only been able to find high gloss Future product.
ReplyDeleteHi and thanks for commenting. I´ve stopped using floorpolish and only use window cleaner or washing up liquid. A couple of drops of either to about 300ml of the cleaning /mixing water. Washing up liquid contains salt so one drop des the trick...also helps clean the brushes :-)
DeleteThanks for this, will try it out!
Delete