Bit of a Long post this one.....so here goes;
After seeing
THIS amazing
Medieval town terrain in forced perspective by
Neldoreth I had to have a go...I thought it would be easy...but it isn´t.
First the final result
 |
I haven´t got any medieval bods smaller than 1/72nd to put in the Back so I´ve used some of the good folk from Bodstonia.
|
 |
| A cavalryman from the risk game |
 |
| The cavalryman takes a risk....... No? Not even a titter? |
 |
| Some of the residents posing |
How I did it.
The easy bit
First the base. Large bit of card..this one is 22cm´s Long and 11cm´s wide.
Draw a Middle line then 2 converging lines (which represent the row of houses converging) 4 cm´s from the centre at the bottom and 2 cm´s from the centre top. The base was then raised at the furthest end by 2cm´s. Why 2 cm´s? It´s purely random, ie; I didn´t think about it, it had nothing to do with the 2cm´s at the top but thinking about it it probably has some relationship with the effect....or not?
The hard bit.
I held a Piece of Card alongside one of the sloped sides, drew a line which would be the street level. After creating the first house it became obvious this wasn´t going to work..I had no fixed reference Point for the "horizontal lines". The Vertical lines were ok but the "horizontal lines" were totally wrong!!
Then I thought about things a bit.....and went for the disappearing Point method. This meant adding a bit to the end of the base, extending the lines until they met.
This gave me the Basis to create a template. For each individual house I added placed a Piece of Card over the template, then drew the lines over the Card.
The line in the middle acted as a base for drawing the vertical lines.
The vertical lines are easy..to create the "horizontal" lines I used a Long ruler, fixed to the "Dissapearing Point". For the end house, the one nearest the camera I used similar sizes as if I was building a house in scale..for the next two it was by eye
Test shots...the effect seems to work.
Pre-paint on the base..the horizontals and verticals work.
Painted, Windows and doors added, and on a Level surface. Halfway through the tiling I realised the normal size of tiles (the house on the far right) would look way too big on the end house...so I had to make three different sizes.
Both sides and the end house finished...and they are now on a wider Piece of card.
A couple more test shots.
Can you see the tiles!!? Nope!? Did they Need to be smaller? That was a ..kin waste of time!!
Bod in front ..
Bod at back.... The lines on the base were as an aid for adding cobblestones but I gave up on that idea. (the tiles are base painted and pre-drybrush)
From above.
To create a similar optical depth as the "forced perspective" model (22 cm´s Long), I had to line up 6 full sized buildings with a street length 60 cm´s plus.
Working out the angles proved the biggest headache but it was a fun Experiment. Exactly what I will do with it now I still don´t know..but I´ve learnt a lot about the technique so at some Point I´ll have another go but with a slightly different technique and subject period and try a more
compressed Version.
And... a wee bit early but I´ll post about it as the time draws near.....
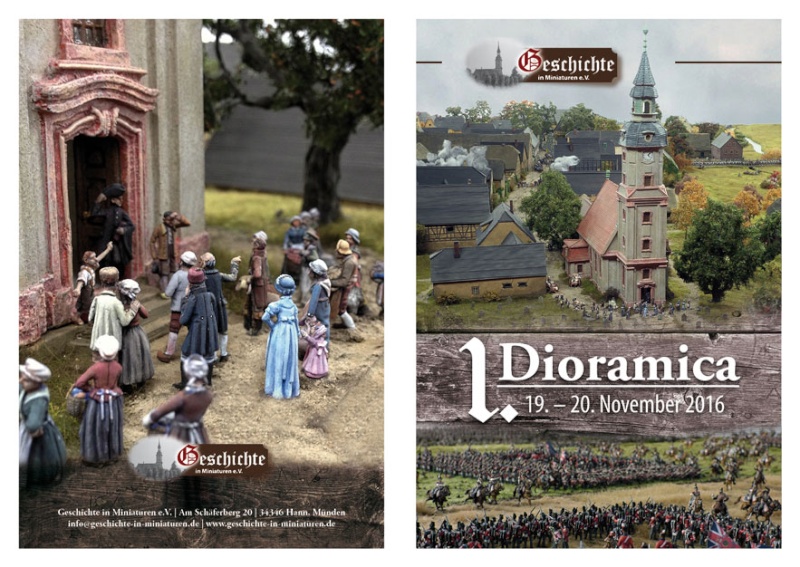
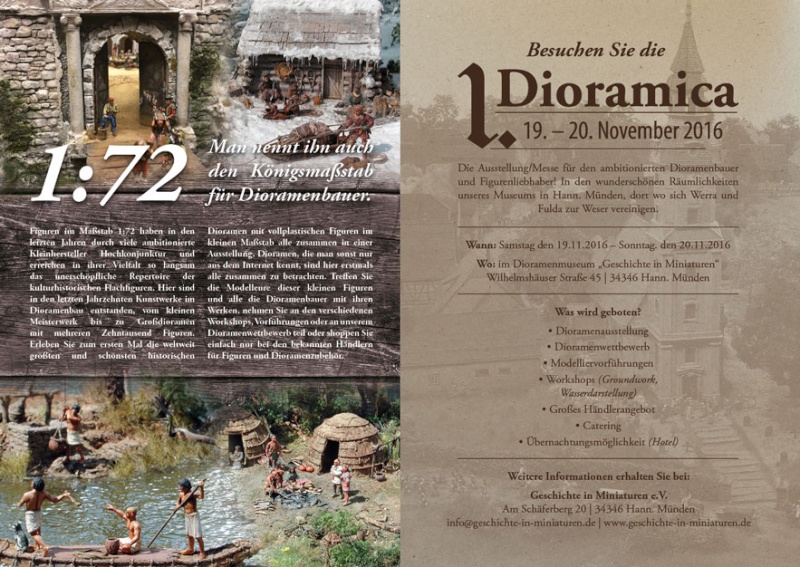
1. "Dioramica" 2016
Message from
Wolfgang Meyer;
"Saying large dioramas is saying 1/72nd scale. Figures in that scale have become extremely popular with modellers over the last couple of decades, and they are produced by a growing number of small series manufacturers. These figures now cover a huge variety of historic subjects as they were formerly offered by flat figures only. Over the years, there have been created real works of art, ranging from the masterly vignette with just a few to superdioramas with tens of thousands of figures.
We, i.e. the members of the ‘History in Miniatures’ society, have been pondering for a long time how we could make our fellow hobbyists, who are dedicated to the building of historical dioramas just as we are, join us for an exposition to present their work.
This has been a big dream of ours which is now coming true.
For the first time ever, some of the best sculptors and painters of small scale figures, as well as some of the most ambitious diorama builders from all over Europe and nearly all the well-known vendors who provide for our hobby will meet at a single venue.
An exposition-plus-fair as we are planning requires painstaking preparation. First of all, we had to find a date that would be okay for all, and we think we succeeded.
The First Dioramica will take place on the weekend of November 19‒20, 2016. The venue will be our diorama museum ‘Geschichte in Miniaturen’ in Hann. Münden. In addition, we will be able to use the spacious premises of the hotel in which our museum is situated.
A large number of sculptors, figure painters, modellers, diorama builders and vendors from all over Europe share our enthusiasm and promised to join us. This will be a singular opportunity to get a life view of many of the dioramas which have been known from the internet or from diverse expositions and scale modelling fairs only.
The dioramas ‘Rome 170 A.D.’, ‘Cröbern 1813’, ‘Möckern 1813’, ‘Northern Italy 1813’ are centre pieces of our museum and ready for viewing. In addition, we are working frantically to finish our ongoing projects in time ‒ the large dioramas ‘Teutonic Order 1329’, ‘Rosenberg Fortress 1806’ and ‘Auenhain 1813’.
Furthermore, a great number of dioramas made by some of the most well-known modellers from all over Europe will be on exposition, covering all epochs from antiquity to World War One.
There will be a diorama competition and workshops on figure sculpting and painting, as well as on the making of model structures, terrain and water for dioramas. The hotel will provide catering and accomodation, and the town of Hann. Münden and its pleasant surroundings offer many attractions for the entire family.
For additional and up-to-date information see our Website;"