This time I´ve given a bit more thought to the basing. I´ve made the bases so that each section can be rearranged to give a different layout when needed.
The "decoration isn´t finished, bushes , trees, a bit more grass and a few animals will be added.
 |
| Random arrangment. The two round huts (pig keeper on the right) are re-used from this dio...NO TAXES!! |
 |
| View from "pig keepers" across the square, of the pub |

 |
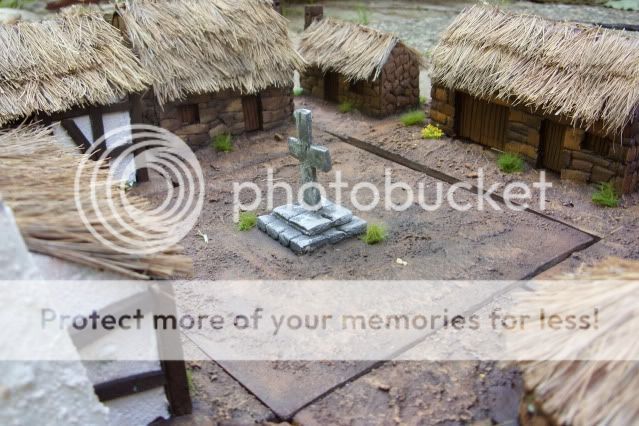
| Set up in a "the injuns are coming!!" pattern |
Hello to Wilson Edward Toy Soldiers. On his blog,Wilson Eward Toy Soldiers, he shows a grand collection of 54mm Bods and his other Blog, Land of the Lead, deals with all aspects of bod collecting...with some very clever photos..
Hello to Anubis 88...now this is where it gets a bit confusing because yesterday I saw that Yarik from Yarik Miniatures blog, announced that his friend had set up a blog...called Anubis Miniatures. but he has an Avatar, and Anubis 88, hasn´t. So either you are both one and the same or......different, which would be a big coincidence :-D Anyway...thanks to Anubis 88 for following and look at Anub
Publish Post
I´d like also to give a shout for Irqan´s blog, Plastic Zombie. He´s been about on the net for a while but has just set up his blog and will be using plastic bods for Zombie gaming...looks fun already :-D
Amazing!!! :-D
ReplyDeleteVery nice made Paul!
ReplyDeleteBut it looks so cheap ;-)
Greetings
Peter
nice use of things found around the house. these look great.
ReplyDeleteGreat buildings and great photos I like the one from the Pig keepers to the pub!
ReplyDeleteExcellent stuff again Paul! And simple but effective idea about the basing
ReplyDeleteGreat looking village, I have some Vikings who like to come and pillage and loot it! :)
ReplyDeleteGreat stuff! While I'm waiting on funds to get a magnifier for painting; I'm making a ring fort for the Celtos game I shall be painting. I'm making round thatch huts and can't seem to figure out how to make the roof. Thought of the brush, but my wife wouldn't let me destroy the poor sweeping brush in the garage. You mention card, how did you do it conical?
ReplyDeleteVery cleaver - I like the basing arrangements, which I am doing too with our Dark Ages buildings.
ReplyDeleteI like your thatching effects - if you want to try something different, give teddy bear fur a go. Thats what I have used and while it is very fiddly, it has a great result too, and will give you a bit of variety in your village.
Did you sculpt those circular Celtic style huts? I like them very much too!
Great stuff as always Paul - most inspiring!
Thanks for sharing
Pig keepers of the pub!!! :-)
ReplyDeleteI like it Paul.Very good work!
T.
Wow Paul you are a very busy boy. Great work as always.
ReplyDeleteVery nice work my friend, talented git.
ReplyDeleteVery well done Paul. Most impressed. You have given me some good ideas for the Dark Age builings I started last night.
ReplyDeleteThanks :-D
ReplyDeleteI will do another "how to" for the round huts and the thatching...it is also very easy as I´m a lazy git who likes to take shortcuts :-D
Cheers
Paul
Well if your shortcuts turn out like that, I'm all for them matey!
ReplyDeleteVery effective and looks really nice.
ReplyDeleteChristopher
Great work Paul. I bet gluing those bristles on was a bit messy!!
ReplyDelete