Ok, it´s not medieval but why not ? *


The kit Comes with "pre-waved" stickyback Flags which are slightly shiny so I created my own printed versions and replaced one ( Christopher Hatton´s Coat-of-Arms) with the Tudor Rose.
The kit doesn´t give the choice of a full hull or waterline version, just full hull so some surgeory was needed to create a waterline one.
Also...I went for a "we´re just larking about on the water" look with the lower gun ports closed...apart from one slightly open but without the gun Barrel protruding.


The Crew.
From RedBox 16th-17th Cent Spanish and English sailors.


The Guns.
Generic red coloured carriages, black iron barrels and Fittings (they look shinier in the pic than in real life)They got a wee bit of an upgrade. Barrels bored out, Scratchmade Breeching ringbolts added and handles added to the quoins.
I could have gone well over the top with them by adding Train tackle and gun tackle loops but that meant adding 5 more smaller rings to each gun so I went for the Basics and did 16th-17th Cent guns have all the bells and whistles anyway?


Drawing a line? Tape? Guessing?
After a bit of thought...get a bucket of paint and literally float the hull in it.
I attached wires to the fore and aft railings, pushed the hull into some White wall paint, lifted it out and using the wire, hung it out to dry before cutting of the hull below the "waterline"
Holes drilled for attaching thread for opening of the gun ports and work started on adding some detail to the railings.


I swore at myself for even thinking of doing this as it was extremely fiddly and took ages.


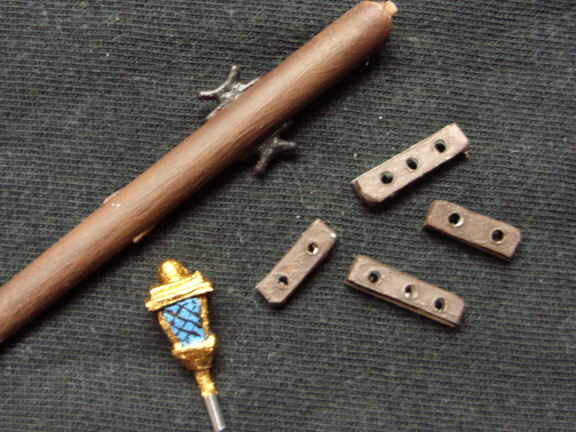
Mast painting finished, pulleys for the shrouds, pin rails and lantern added.

The kit comes with a rigging frame for creating the shrouds/ratlines but I decided to go for adding them "in situ" so tiny holes had to be drilled in all the dead eyes, even the tinsy winsy ones.


As to wether the anchor is positioned exactly as it would have been. Having the flukes (metal hook bit) any further back or forward on the shrouds would have meant the pulley wouldn´t have hung freely so it is were it is.


Tip. As the sails are thin vac-formed it´s wise to add a thread around the edges of them. This prevents any tearing when drilling holes and when adding thread to hold them to the spars etc. Use second glue to do this as due to them being thin, using plastic cement could dissolve them.

When all dry, cut to length and paint over where the ratline crosses the shroud.
The piece of paper made it easier to see the shrouds.
I cut groove in the sides of the boxlid as a rest so the ship could sit at an angle making work easier.

TBH, it was more a challenge to complete than fun.
The fit of the hull and the deck was difficult, the bulkheads and the walkway on the Stern don´t fit 100% flush but that´s probably down to my ignoring the sequence suggested in the instructions but, if I had followed them, it would have been more difficult to paint the various parts.
There´s no proper rigging plan or blocks etc and rigging it was a test of Patience.
No choice of a full or a waterline Version.
My additional "up-grades" didn´t help with making the build any easier but I don´t think I could just have gone ahead and not added them.
*I refer any historical innacuracies to the Management.
Wonderful result Paul for what looks like a lot of hard work.
ReplyDeleteA splendid piece of work, brings back memories of a very badly assembled version I did back when I was ten.
ReplyDeleteLooks great! I bet hours of hard work paid off.
ReplyDeleteWell this challenge did work well, my compliments!
ReplyDeleteYou dane a great job in this small scale.
Love the figures, great choice of colors.
Great looking Golden Hind! Definitely worth all the extra effort!
ReplyDeleteBest Iain
Utterly amazing! I had that kit many years ago but if I had the skill and patience you have, it would be on my mantlepiece!
ReplyDeleteIt's a work of art ol' chap!
ReplyDeleteThanks ray :-) Sotherbys have started the bidding at..er?...40 g´s :-)
DeleteWonderful work and ... what a building effort. All of us should build at least one sailing ship in our lives.
ReplyDeleteThanks :-) This is, for me, ship no 5 and before the first one I never thought I would build a ship but I totally agree..everyone should buld at least one..and then Maybe another :-)
DeleteStaggering job Paul, looks amazing in the photos, especially like the idea of doing a waterline conversion.
ReplyDeleteThanks :-) I forgot to add that the first Version of the waterline isn´t the finished product. I cut another 1.5cm´s off the Bottom as it looked to high...if looked at closely the waterline gets Closer to the Bottom step (left/Portside)
DeleteWhat a wonderful Ship ! The perfect example of what I'm unable to do ... I'm impressed ...
ReplyDeleteThanks :-) what I´ve done with it is way over the top..but the kit as it was is quite basic...and I like fiddling with Things. I think you have enough skill to create something similar..esoecially if it was a better kit..and there are some ..I may have my eye on one or two :-)
DeleteA beautiful job!
ReplyDeleteI always enjoy the descriptions of your building process.
Herkybird is correct, it is a kit deserving to be on the mantlepiece.
Thanks Paul :-) As far as i can I try to include the process..it Shows how the ideas (and excuses in some cases) come About. Having a set of pics of a finished model are ok but I feel the process of how did it come to be like it is should be shown..if possible.
DeleteWow! Superb. It's nice to see old Airfix kits like this can come out looking so good with due care and attention. I've been making a series of their 54mm Napoleonic figures. Very old, but can come out looking pretty good with some extra effort. But your boat? Wow!! Literally and figuratively, on a different scale! Congratulations on a job very well done. Thanks for sharing.
ReplyDeleteAbsolutely stunning. Shows that old Airfix can still polish up well after a bit of TLC.
ReplyDeleteOf course, having a phobia of model sailing ships, I would only admire it from afar!
An extraordinarily brilliant job, Paul. I'm lost in admiration!
ReplyDeleteGreat work. I have two of these ships that have been sitting for years. One of them half built. This post certainly gives me some inspiration.
ReplyDeleteVery ambitious project, Mr. Bods. And a real beauty to behold.
ReplyDeleteWhat a great build, Paul. Fascinating to read through all of your attention to detail. Well done!
ReplyDeleteExcellent...
ReplyDeleteMy (+ 25year?) old one (seriously in need of a re-paint and re-rigging) stares accusingly at me from its shelf even as I type...
Nicely done. Thanks for listing the figures. Is this kit actually 1/72? Well done
ReplyDeleteThanks David :-)
DeleteTheyßve put 1/72 on the box but I haven´t measured it and done the calculations, I reckon it´s more the usual Airfix scale, 1/76th. They did the same Thing with some of thier AFV´s, re-released with a 1/72nd tag although they had been put out as 1/76th ever since they had been molded.
Still, the bods seem to fit :-)
Seeing this post months late and loving this ship! Especially the modifications and scratch bits. I haven't worked with a ship this large a scale yet. After seeing your work I may have to acquire one
ReplyDeleteI'm just starting on Heller's Golden Hind, thanks for this thorough account.
ReplyDeleteDid this kit not come with a "rigging machine?" My Airfix Wasa and Soleil Royale both did.
ReplyDeleteHi kkollwitz.
DeleteIt did but I decided not to use it for 3 reasons.
1. Using, with having to criss cross the ratlines over the shrouds means wasting a lot of thread.
2. I looked at other peoples attempts with using the "machine" and the end result looked a bit loose. Either they were at a wrong angle or the sagged.
3. The way I did it allowed me to add Tension to the mast. Not too much but enough so the shrouds, when added on both sides, would pull them selves very straight.
Method. Seeing as you have made ships already You probably know this but just in case...
Loosely (without tying or glueing) add the middle shroud to both sides of the mast. Tie or glue at the top and have the thread at the Bottom so that it is put through the Bottom middle block from the deck side towards the hull side. Hold the ship so it´s pointing towards you (prow or Stern) Add second glue to both left and Right Hand blocks and pull the threads tight, watching to see if the mast stays straight. Hold until the glue is dry, then tie off.
It´s a bit tricky to do but once the two middle shrouds are fixed the others can be done one by one but I repeated the above method for each pair.
Have fun with revells version
Grüß Gott
Paul
Hi Paul, I'm doing the golden hind too, I'm on to the stage of making the rigging, any advice.
ReplyDeleteBasically, all the advice I can give, apart from what I´ve written above combined with the pics is have a lot of patience and take your time:-) I´ve never rigged a ship before, not one with shrouds and ratlines but with care it´s not too difficult.
DeleteThe rest of the rigging. I was lucky that I had a lot of spare blocks from an old broken kit but there are sets of blocks that can be bought online that serve the purpose.
Apart from that, have fun rigging :-)
I'll just have to give it a go, what do you mean by "blocks"?
ReplyDeleteBlocks are the wooden (or metal) set of pulleys or sheaves mounted on a single frame that the ropes (the tackle) goes through to produce a mechanical advantage as in here;
Deletehttps://commons.wikimedia.org/wiki/File:Blocks_and_Tackle_(PSF).png
Hi my friend.. What thickness thread I can use or fishing line..
ReplyDeleteHi. I used 8 threaded garn. Light brown and then stained in black tea. I cut a length, divided it into two lots of 4 threads. Then with a bit of woodglue on finger and thumb I pulled the thread between, slightly twisting it as it went. leave to dry on a glass surface.
Delete