Friday 31 August 2012

Medieval Assassins!

12 dark shadows whose purpose is to "remove" people and carry out other small "tasks"  for money.
You have heard that they exist, you may have heard of thier deeds or even met someone who claims to know one but the only time you will ever really know wether they are real or not,  will be the last thing you know.
This set is by Alex for Valdemar and soon will be  available from Fredericus Rex
The Brotherhood together. The bods come unbased so I´ve used some spare bases from the Emhar Saxon wariors set as temporary ones 
Signalling that he´s suceeded in opening the castle gate
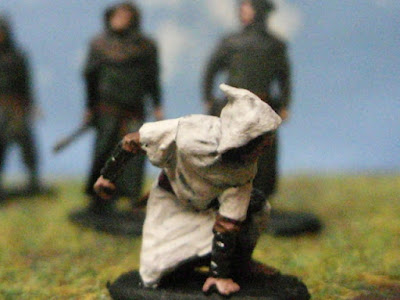
Of course I had to paint one up   "Assassins Creed" style

As ever, it´s not only the poses that make these bods really excellent..it´s Alex´s creation of such expressionate faces!!


And now a rare opportunity to see  some of the members of the Brotherhood in action!

In medieval Khandibah,  someone who prefers to work alone is about to leap into the pages of history.
 Meanwhile in Styrow on the Foam, the king  is passing through...but.....
...from the left

from the Right.....
..and to the front, the ambush is about to spring into action.


Wednesday 29 August 2012

Native Bodstonian Indian

As the only native American in the Italeri American Infantry set, it must be assumed he´s a scout.
I´ve named him Adahy ("Live´s in the woods") and he´s been given a place in the Bodstonian world.
Adahy at home in the Bodstonian forest
Hello to David Cooke from David´s Wargame Retreat Blog. He´s got some fine stuff, the napoleonic minis are great.

Sunday 26 August 2012

Louis II de Male

Louis II de Male (Count of Flanders) I painted this bod up as Loius II due to a painting comp at the Valdemar Forum..
The "rules" are;
- Medieval king/high ranking knight (mounted, dismounted, running, sleeping)
- One animal (not a horse, but a horse can be included)
- One handpainted shield with heraldic (no need to be advanced)

Usually I would use transfers or printed Heraldry and this is my first real attempt at creating them freehand (and my last! :-D )
The bod is from Valdemar and the hound from Outcast figures Set Nap. Ziv. 03. I twisted the neck of the hound so it ended up looking around slightly.
.
A couple of other "style" photos.
While I was painting the dog I used tweezers to hold it by one of it´s legs (it comes unbased)
After a minute or so my concentration would lapse, my grip on the tweezers  loosened and plop went doggy. Also putting the dog down to rest on it´s feet was near impossible so, a flash of inspiration and  I came up with a solution :-D Wrap a small rubber band around the tweezers!
The rubber band is wrapped around the base end of the tweezers, the piece to be painted held and then the rubber band rolled towards the piece until it grips tightly.
This not only means a constant grip is maintained on the piece but it can be put down without any part of it sticking to a surface!


Hello to Francois Simon from WesterNCity N Scale Layout blog. He´s only been blogging a couple of months but already has some great stuff including A really good run through on stage by stage building of a wild west train diorama.

Also..new on the web is a site with all the colour conversion charts you need..plus a gallery, kit instructions (in case you missing them) and more at Scale World

Friday 24 August 2012

Pieter De Coninck (and friends)

Pieter has already turned up on this blog, HERE...and his new friends have turned up elsewhere before.. not here though...but HERE ;-D

Anyway...they have now travelled back. Peter´s done a fine job on them, all I´ve done is add a standard bearer and base them. .
Slowly a small but determined force builds to fight the enemy in the Battle of the Spurs
Pieter forms his troops into a spear line 
I really love the combination of  yellow and brown!! I´ll be forced to add some more to this 1300´s  Flanders army
It took a bit of experimentation to get the yellow and brown to match the rest

Tuesday 21 August 2012

Napoleonic Austrian Pioneers (FINISHED!!)

Finally..they are all finished. HUZZAH! HUZZAH!!
The last 30 were painted in the last couple of days..and then...........the one´s that had previously been painted were, one by one,  re-inspected.
Missing bits and pieces were filled in.
Epaulettes,  buttons  and chinstraps added.
Faces and hands re-painted.
I´d painted all their drink bottles as wood, with a white belt..but then it turns out some are wood with a brownleather belt or Aluminium coloured with a white belt.
The drummers got a white edging added to thier collars, birdsnests and the drums repainted.
The officers had their Cummerbunds changed from gold to yellow.
My photos aren´t that good.. The camera has developed a "ghost" in the lens but they will soon get a new home on the Croeburn 1813 diorama and better photos will be taken.


Hello to QuidamCorvus from QuidamCorvus Blog. Fantasy modellining and painting on a very high level...his buildings have to be seen to be believed!!

Sunday 19 August 2012

Bodston Builders

I haven´t the time to build a cabin myself and even though their rates can be high, somebody´s got to build the place 
A patch of Ground being cleared 
Posts set to mark the outline of the cabin.
The builders, Emmet, Francis and Peter Braunstone. More About them and thier lives HERE

Friday 17 August 2012

Tent Making (triangular form)

I´ve done making  Tents before, The medieval ones, but this is  a little how to on making triangular tents, and Trappers and Adventurers need tents.

So, stuff needed. Pair of scissors, some thin card, sheet of A.4 paper, sheet of polystyrene, sewing thread, sheet or two of toiletpaper, some glue, a sharp blade,  a couple of toothpicks, pen, ruler, a couple of thin twigs.(best are dried out hawthorn twigs) some sand and paints.

Decide how big, long wide and tall the tent will be. Cover the area with glue and sprinkel sand over it. Stick two cocktail sticks into the foam and cut them down to just about head height of a bod. Using the blade, cut a slot into the top of each stick, so that the slot is parrallel with the length of the tent.(ie from front to back)

Cut a strip of card to the height of the tent.  For the tent being made I needed a strip 17cms long as each side is 5cm´s long and each side is 3.5cm´s wide.Along the length of the strip I made a line. I chose the height by eye. Divide the ends of the tent  in half to give the points of the top. Basically, everything outlined in orange will form the sides of the tent (and dont´foget to leave a tab to glue the open side together)


Cover both sides of the card with toilet paper. This is easiest if you just lay the card flat, smear a thin film of glue over it and lay the toilet paper over it. Press down then remove (toilet paper is always in at least two layers) the top layers. When it´s dry, glue together to form the inside of the tent. Cut a slit (not all the way to the top) at one end the make the tentflaps.When all´s dry, paint.

Next the topsheet. Fold  a piece of A4 in half and cut a piece roughly the right size..better to big as too small though. By a bit of trial and error, laying the folded paper over the tent *, you need to end up with a piece with  about  1 cm overhang on the sides,  the front and back. Now the fun bit. Make a small fold at what will become the front and back of the topsheet. Put a thin smear of glue along each fold, lay a length of thread into the crease and fold flat. The folds will end up as the underneath of the topsheet and won´t be visible. For the middle guyropes, smear a line of  glue from one side to the other, lay the thread along it and then press a strip of paper over the top.
When all is dry, add a layer of toiletpaper as with the sides of the tent. When dry, scrumple the whole thing up into a ball. This makes creases and roughs the paper up. Unroll, Press flat and paint.  
Paint and decorate the ground, adding whatever inside and out.  Glue sides of the tent in place. Take 8 pieces of twig, 3 for the guyropes on the sides,  and two for the front and back guyropes. I used pieces about 1.5cm´s long. Using a toothpick make holes where the tentpegs will go, drop a bit of glue into the hole and then stick the peg in. You can make the pegs look like they´ve been hammered into place by dipping one end of the twig into water and then squashing it onto a hard surface to create a "mashed up woodgrain" effect. 
When the pegs are firmly glued, attach a length of thread to the front or back peg. This is then put into the slots on top of the toothpick tentpoles, pulled tight and then attached to the other tentpeg.
Add a bit of glue along the top edges of the tentwall and add the topsheet. Tie the guyropes to the side tentpegs and finished. I added a small dab of glue at the top corners of the topsheet at the front and back and then pinched it togther..looks better than it sticking out like it´s made of ?...well...stiff paper :-D

The end effect is that of rough canvas. To make it as animal skins I would have done it more or less the same way until the painting part. Here I would have drawn a pattern of skins (or squares like a quilt) onto the topsheet, then painted each "skin" in different brown tones, using a slightly stiff brush and thicker paint, making sure to paint in different directions for each skin.

* There is a way of calculating the size of paper needed for the top sheet. Measure the length of the slope of one end, times it by 2 and add a cm or two. Measure the length of the tent, times that by 2 and add a cm or two....but I´m a lazy bugger and couldn´t be bothered to pick up the ruler. :-D

Wednesday 15 August 2012

Trappers and adventurers

James Forrester and his two companions Pierre and Pascal Albon.

Pierre and Pascal Albon. More about Pierre and Pascal HERE
The history of James Forrester HERE

The history of James Forrester HERE

Monday 13 August 2012

Medieval Pike block (Pt 1)

The start of a pikeblock,  which is planned to end up with at least 50 bods in it. The colour scheme is  based on the swiss canton of Uri.
The first 12. Bods from, Redbox, Revell, Miniart, Italeri and Strelets, Pikes selfmade from floristswire
I´m assuming they would have held pikes above thier heads...they are pretty heavy things but back then they were pretty stocky strong people.
For a brilliant diorama of 13th century Birmingham click Here. It really is very inspirational...makes me want to get down to making  a few more buildings for Styrow on the Foam